Flower Shop Card

image

I have created 2 cards for my guests to complete at my Friendship Sampler Class on Wednesday.  If you missed the last post, please scroll down and see the details.  I will post the other card tomorrow — it uses the new Chalk Talk and Framelits set.

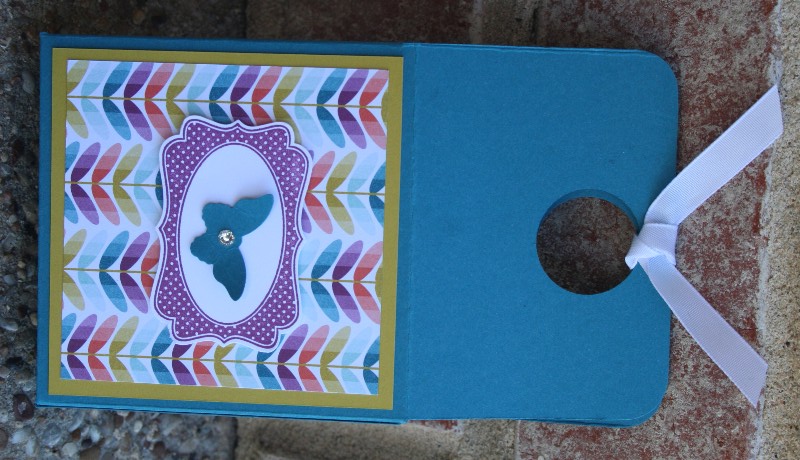
This card features the new Flower Shop set and matching Pansy punch.  This was one of the first things I ordered from the new catalog, and I look forward to making many projects with it.  I also used some new Designer Series Paper and a new set of Framelits.  I like how this turned out — it is fresh, bright, and fun!

image

Stamps:  Flower Shop and Sassy Salutations

Cardstock:  Strawberry Slush, Whisper White, Island Indigo

Ribbon:  Island Indigo Satin (from Sale-A-Bration)

DSP:  Gingham Garden

Framelits:  Deco Labels Collection

Punches:  Boho Blossoms, Pansy

Misc:  Large Pearl Basic Jewels

Modern Mosaic Trio

Cherry Cobber Name FrameIsland Indigo Family FrameCoastal Cabana Family Frame

Do you want to make one of these Family Frames?  Have you RSVP’d for this class?  Please click here for class details.  If you would like to attend, please let me know how many you plan on making, and which color.  I must know by Wednesday so that I can cut paper and prepare all of the supplies.

Mosaic 1

Today’s card was one of our projects from Stamp Club last week.  We used the Modern Mosaic Stamp Set, Punch, and Embossing Folder — The Modern Mosaic Trio!  These 3 items work together beautifully, and have quickly become very popular new products.  I also incorporated a strip of a new DSP collection, Quatrefancy, and lots of new In Colors.  And how about the new little ruffle ribbon peeking out from under the greeting?  The feminine side of me really likes this new product!

Mosaic 2

If you like the looks of these words, you’ll want to take advantage of this set while it is on sale 25% off.  There are 3 word sets on sale, so take a look HERE and see what you think!

CM1554B

Happy Father’s Day

fathers day card Today’s card is CASED from one of my fellow Stampin’ Up! Demonstrators, Amy Storrie, who is also one of my Sorority Sisters from my Baylor days!  We reconnected years ago when we noticed each other at a Stampin’ Up! event.  Amy is a fantastic demonstrator who lives in McKinney, TX and is currently on the Stampin’ Up! Advisory Board.  Yes, I feel like I know someone famous!  And I knew her before she became famous – ha!  Her version of this card can be seen on her amazing blog, Stamped with Joy, but she used our new DSP called Modern Medley.  I didn’t have that, so I improvised with our Neutrals Paper Stack and it worked just fine.  However, her card has totally convinced me to order that DSP as soon as possible. Other items used for this card include:  A Fitting Occasion, Label Love, and Teeny Tiny Wishes stamps sets, Label Love and 1″ Circle punches,  Gumball Green Ink & Cardstock, Dimensionals, Mini Silver Brads, Black StazOn ink and Basic Gray Ink.  In the midst of posting this photo, I just realized the words are upside down on the top square.  OOPS!

Happy Father’s Day to my wonderful husband and awesome father to our 3 girls and 18 foster children!

IMG_1576

IMG_0420

Perfect Paper Bows

I stumbled up on the most adorable (and EASY) way to make a perfect paper bow!  I just knew my Club Ladies would like this idea, and sure enough, they loved it!  Tonight was our last formal club gathering until the end of summer, but we will start up again in late August.  If you would like to join us in August, please let me know.

You can find the “perfect paper bow” instructions from Elizabeth Price’s blog, Seeing Ink Spots.  She is in the upline (or sideline) of my fellow demonstrators in Florida, and I have always loved her work.  This may be something that you’ve seen in a lot of different places, but its a first for me.  I’m hoping you will give this technique a try and be inspired like me!

sketched birthday 2

The Designer Paper that I used is a retired product, sorry!  The focal image is from Sketched Birthday — and I was reminded how thankful I am for Stampin’ Up!’s generosity.  We received this stamp at Leadership this past January, and I had forgotten that it was going to be in the new catalog.  This is my first time to use it, but I think it added the perfect touch to the card.


Sketched Birthday 1


April Club Project #1


Pleasant Poppies 3


My apologies for the poor quality of these photos……but I seem to have to do everything late at night these days!  We made 3 projects, as usual, and this was the “simple” project for the April club classes.  Just a basic card, nothing fancy, but everyone enjoyed it and agreed that we never seem to have any Sympathy cards handy when we need them.   This card is made quickly by using the Pleasant Poppies background stamp, Designer Series Paper Stack (Neutrals) and punches.

IMG_1646

Just about the time that one of my ladies was “stressing” over getting the words centered in the middle of the Four Frames stamped image, I reminded her that we were stamping it on Whisper White Cardstock and punching it out with the Oval Punch.  She breathed a sigh of relief when she realized that her card would turn out “perfect” and her words would be centered!  Don’t forget that you can make things EASY on yourself by using punches and even more punches!

Have a great week…….I’ll be back with the other 2 projects.  We have class tomorrow night, and I can’t wait to laugh with some of my favorite ladies!

Butterfly Punch Card

butterfly punch card 1

I’m back from a fun weekend with some of my best girlfriends.  It was a wonderful escape, but it’s back to reality now!  I am sad to report that our little foster child has a fever tonight, and I’m worried about her…….and asking for prayers for a speedy recovery.  She is such a spirited little girl, but she was sad and pitiful tonight and it made me sad.  I took several unfinished sewing projects, and I will look forward to taking photos of them and showing them to you all.  I have missed my sewing time SO much since I started working full-time.  I have managed to squeeze in some stamping time, but very little sewing time.  I’m eager to sew some sweet things for our new little girl, but I guess I’ll have to learn to survive on very little sleep in order for that to happen!

I hope you enjoy a simple idea using our new baby butterfly punch.  I punched the butterfly first, and then punched the 1 3/8″ punch around it.  Then I stamped the words on a 1 1/4″ circle and layered that behind it.  I based this card on a sample that I saw at Leadership, but tweaked it a little bit.  I used the More Amore Designer Series Paper to formulate my color scheme — but I naturally gravitate to these colors, anyway.  As usual, I sponged the edges with Soft Suede cardstock to add definition and depth.

butterfly punch card 2

These cardstock colors are Pool Party, Read Red, and Regal Rose.  The little “hello” word is from “Pennant Parade” — images shown below.  The clear set is $16.95 and wood is $21.95.

pennant parade

A little Chick-A-Dee Treat

chick treat 1

This is a cute little 3D Treat that we made at my workshop on Saturday.  It is super quick and easy……and sure to please the young and old alike.  I used Daffodil Delight and Pumpkin Pie cardstock, and a few simple measurements.  Start with a rectangle measuring 3 1/4″ x 8 1/2″ and score it at 3″, 4″, and 7″.  Grab a spool of your favorite ribbon and tracet he curve on the end that measures only 1 1/2″.  This end will form the flap (or the “head” as you might want to say).

chick treat 3

Crease on the folds, and sponge all the edges with Daffodil Delight ink.  For the feet, I used the largest flower from the Boho Blossoms Punch.  You can trim them off as shown in the photo and attach them with Dimensionals.  I free-handed a triangle beak, and used one of the smaller flowers from the same punch for the tuft on his head.   You will need a small cellophane bag to fill with candy for the inside.  I rolled down the top of the bag and stapled it shut.  Then add a piece of Sticky Strip to the base of the treat so that you can attach the cell bag on the inside.   Use an Early Espresson marker to drow the eyes…..and you are just about done!  You may have a much better idea, but I used Velcro to hold these treats together.

chick treat 2

I hope you have enjoyed this cute little project……and can use it this spring.  I have club classes this week, so I have several other goodies to show you.  I look forward to seeing all of my stampin’ buddies this week!   For those who haven’t heard, we have a new foster child in our home.  She is 2 1/2 years old, and definitely the light of our lives these days.  She is bringing so much joy to our lives, and we are working so hard to help her adjust.  She is gorgeous, and funny, and silly, and a typical toddler.  She loves to say “no” and she’s only interested in things that are “mine”!  I look forward to sharing her with each of you!

Sycamore Street Box

box 1 

We made this cute little box at club last night, and my guests also enjoyed using the new Stampin’ Up! Paper Trimmer.  This paper cutter/scorer is fantastic!  You will fall in love with it……..and it looks so pretty, too!  I didn’t think I EVER needed to purchase another paper cutter!  If you are like me, you have owned quite a few in your paper-crafting lifetime.  But this one seals the deal!  I think you will enjoy it as much as I have. 

box 2 

The image on the front is from “Four Frames”, an oldie but goody!  I just wanted something simple and “generic” so that my ladies would feel that they could give this to anyone, for any occasion.   And once again, the sweet little butterfly punch.  So tiny and simple.

box front

We made 3 notecards to insert in the box, and I will post those tomorrow.  We used the new Madison Avenue stamps, along with the ribbon/button Sale-A-Bration items.  All of my club ladies are now pretty pleased with the Sycamore Street collection 🙂

Have a great weekend, everyone!

“Tea for Two” Butterflies Card

Tea for Two Butterflies 1

The butterflies and the “tea party” joined forces to make a lovely card, don’t you think?  This is one of this easiest cards to make, once you figure out the “perfect” width for the strip of DSP.  I think I tried 3 times — I wanted it to be a nice, round number, and it really isn’t.  But if you go with 1 5/8″, you are pretty close to perfect.

Tea for Two Butterflies 2

You will need 3 strips of your favorite DSP to punch out 3 butterflies, and then 3 solid, coordinating cardstock scraps for the new Baby Butterfly.  No, that’s not really what the punch is called, but it works for me.  🙂

Tea for Two Butterflies 3

Slide your DSP strip in just far enough to cut the edge of the cardstock even with the edges of the Large Butterfly wings.  Position your strips to your desire, leaving one of them short so you can stamp a verse on your card.  It doesn’t even have to be in the middle, that’s just what I decided.  “Just Because” is from the new Sale-A-Bration set called “Vintage Verses”.

Tea for Two Butterflies 4

Of course, you’ll want to add rhinestones or pearls in the centers, just because it adds so much to your card!  Gotta have some sparkle and shine!  have a great day…….and I’ll be back tomorrow to show you one of our Club projects for February.  One of my classes meets tomorrow, so I will be having fun tomorrow night with my club gals!

“More Amore” Valentine’s Class or Kit

I know that I advertised this class a little last week, but I wanted to remind you one more time.  You can attend class on Sunday afternoon (2-4 p.m.) before cheering on your favorite team in the Super Bowl.  Or, you can order a kit and work on it when you are nice and comfy in your jammies!  Take your pick!  $20 for the class (includes the frame) or $20 for the kit (includes postage, but no frame).   You can choose your favorite, HEARTS or XOXOXO, or create your own letters.  I will be happy to punch out your choice!

hearts 1

XOXOXO

Please email me at jdderrick@sbcglobal.net if you would like to place your order.  I have two “TEA FOR TWO” cards to show you in my next post.  You will love them!  Have a great day and I hope you are as ready for the weekend as I am!